Getting Started With.... PowerShell
Overview
Note
This series covers the basics in getting started in various technologies and focuses on the very first steps needed to start learning about each one. Each article is roughly a five minute read with an introduction to the topic and a step-by-step guide to your first experiences with the technology in question.
What is it?
PowerShell is a shell which allows you to administer not only your local computer but also remote servers, and through the use of modules you can script and automate your IT operations on many platforms and with many applications. It was originally developed for Windows systems but is now available on Linux, Mac, and some Arm-based platforms as well.
What tools do I need?
You can install PowerShell on your computer using any of these links.
Download for Windows | Mac | Linux
Note
There are two types of PowerShell, “PowerShell” (a.k.a. PowerShell Core) and “Windows PowerShell”. This article is written for “PowerShell” 7.4 which is the current standard at time of writing which runs on all platforms including Windows, however you will find all these examples run on either flavour and should work on newer versions as well.
Let’s Get Started!
To get going just open a PowerShell window from your Windows Start Menu. You should get a prompt waiting for your first instruction:
1PowerShell 7.4.3
2PS C:\Users\chris>
Cmdlets
PowerShell instructions are called “cmdlets” (command-lets) and are made up of a verb, a dash, and a noun. For example:
Get-Item
Stop-Service
Restart-Computer
Set-TimeZone
Most cmdlets will accept parameters, these are denoted with a dash, for example to stop the print spooler service you would use:
1Stop-Service -Name spooler
Unlike some other shells, the cmdlet itself and any parameter names should always be human-readable (in English). For example to get the items in the C:\Temp folder on your disk you would use the following code, rather than something like dir or ls.
1Get-ChildItem -Path C:\Temp
Aliases are available (and can be created) to enable you to type quickly, for example gci, ls, and dir are all aliases of Get-ChildItem, but when writing scripts it is best-practice to include the full cmdlet name for readability.
Remember you still need to have the correct user permissions to run any of these cmdlets, PowerShell doesn’t grant you any extra privileges. For example, if you don’t have sufficient permissions to delete a file using Windows Explorer you won’t be able to delete it by just switching to PowerShell and using Remove-Item
Help!
One of the most useful cmdlets you will come across is Get-Help. This can be used to retrieve details of what a cmdlet does and examples of how to use it- much like the Linux man command. Try some of the following to first update your copy of the help files
and then see some of the powers of the built-in documentation
1# Update your local help files
2Update-Help
3# Find out about Start-Service
4Get-Help Start-Service
5# Open a web browser with the online help files for Install-Module
6Get-Help Install-Module -Online
7#Get Examples of how to use New-Item
8Get-Help New-Item -Examples
Objects and pipes
PowerShell cmdlets return an object. If you are used to working with Linux, then you probably expect everything to result in a string value. Because it uses an object-based approach you can pass that result between cmdlets, and all the properties are preserved.
And as with Linux and MS-DOS we can join our instructions together with pipes (|) to pass the results of the first instruction into the second (and third, fourth, fifth…..).
For example, if we get a directory contents using Get-ChildItem we are returned all the files with all their information, not just their names. We can then pick out an individual file, and display ALL the properties. These properties have been passed along the pipes as part of the object.
 1PS >Get-ChildItem -Path C:\Temp\ | Where-Object Name -eq test.txt | Select-Object *
 2
 3PSPath              : Microsoft.PowerShell.Core\FileSystem::C:\temp\test.txt
 4PSParentPath        : Microsoft.PowerShell.Core\FileSystem::C:\temp
 5PSChildName         : test.txt
 6PSDrive             : C
 7PSProvider          : Microsoft.PowerShell.Core\FileSystem
 8PSIsContainer       : False
 9Mode                : -a---
10ModeWithoutHardLink : -a---
11VersionInfo         : File:             C:\temp\test.txt
12                      InternalName:
13                      OriginalFilename:
14                      FileVersion:
15                      FileDescription:
16                      Product:
17                      ProductVersion:
18                      Debug:            False
19                      Patched:          False
20                      PreRelease:       False
21                      PrivateBuild:     False
22                      SpecialBuild:     False
23                      Language:
24
25BaseName            : test
26ResolvedTarget      : C:\temp\test.txt
27Target              :
28LinkType            :
29Name                : test.txt
30Length              : 2328
31DirectoryName       : C:\temp
32Directory           : C:\temp
33IsReadOnly          : False
34Exists              : True
35FullName            : C:\temp\test.txt
36Extension           : .txt
37CreationTime        : 25/07/2024 10:00:37
38CreationTimeUtc     : 25/07/2024 09:00:37
39LastAccessTime      : 25/07/2024 10:01:03
40LastAccessTimeUtc   : 25/07/2024 09:01:03
41LastWriteTime       : 25/07/2024 10:01:03
42LastWriteTimeUtc    : 25/07/2024 09:01:03
43LinkTarget          :
44UnixFileMode        : -1
45Attributes          : Archive
There’s several components here. First we’ve used Get-ChildItem to return all the files in C:\Temp. Next we’ve taken that result and used Where-Object to say “only give me the files where the name equals (-eq) test.txt”. Finally we’ve used Select-Object with the wildcard asterisk to retrieve all the properties for that result.
Modules
One of the great fundamentals of PowerShell is how it is module based and developers can create modules to extend PowerShell to make it able to interact with just about anything. Microsoft applications are obviously covered- if you work with Exchange Server, Azure, Windows Server, Microsoft 365, and so on then PowerShell will often be your go-to administrative tool. Other software publishers also develop PowerShell tooling though, and as an individual you can make and share your own tools.
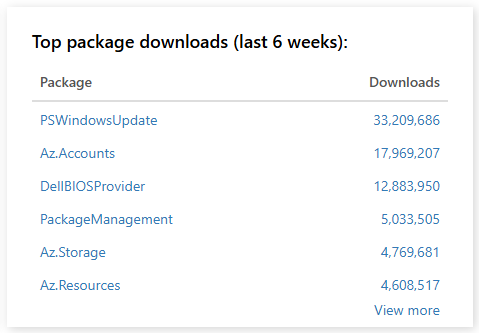
The PowerShell Gallery is a good place to find and download modules, there are thousands upon thousands available there. Some of the most popular at time of writing are the Azure modules, one for managing the BIOS on Dell machines, and one for managing the Windows update client.
Want to learn more?
In this getting started article we’ve learnt what PowerShell is, and how to use it for some basic version control activities.
Here’s a few suggested resources where you can find out more on this topic:
- PowerShell 101 on Microsoft Learn
- There are lots of examples on this site where I’ve used PowerShell to solve a problem or automate a manual process: Articles tagged with Powershell