Getting Started With.... HTML
Overview
Note
This series covers the basics in getting started in various technologies and focuses on the very first steps needed to start learning about each one. Each article is roughly a five minute read with an introduction to the topic and a step-by-step guide to your first experiences with the technology in question.
What is it?
HTML, short for “HyperText Markup Language”, is the code that web pages are written in. The “code” is just plain text, the words on your webpage with special “tags” to tell your browser what the page should look like. It’s straightforward to pickup the basics and quickly learn how to create web pages with formatted text and images.
What tools do I need?
To get started with HTML you just need
- a text editor- this could be something as simple as Windows Notepad, or a terminal based editor like
vion Linux, or something a bit more complicated like Visual Studio Code. This is to write your HTML in. - a web browser- any browser will do: Edge, Chrome, Safari, Firefox etc. This is to see the results of your work.
Let’s Get Started!
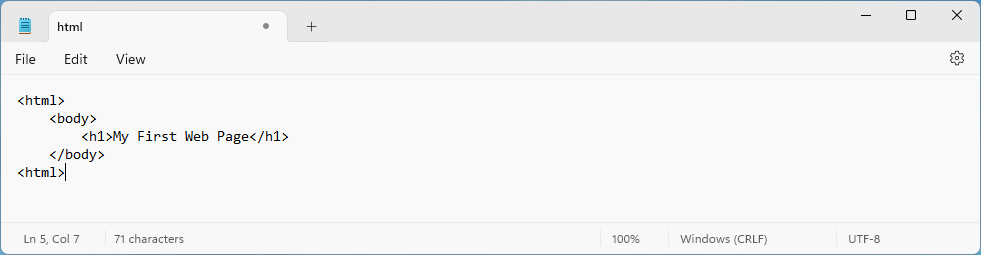
- Open your text editor- Windows Notepad will be used in these examples- and add the following text to a new document. You can copy and paste from here:
1<html>
2    <body>
3        <h1>My First Web Page</h1>
4    </body>
5<html>
In Notepad this will look like this:
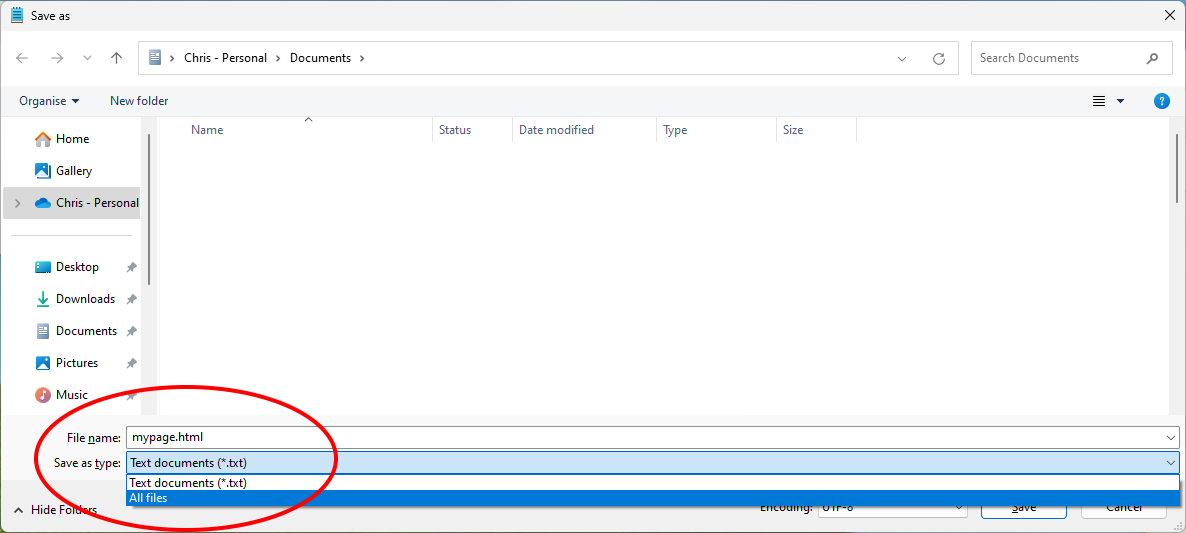
- Save this file as
mypage.html. If you are using Notepad, make sure to select “All Files .” from the dropdown as shown in this screenshot, rather than “Text Files .txt”. if you don’t then Notepad will add.txtonto the end of your filename and it will be calledmypage.html.txtwhich we don’t want.
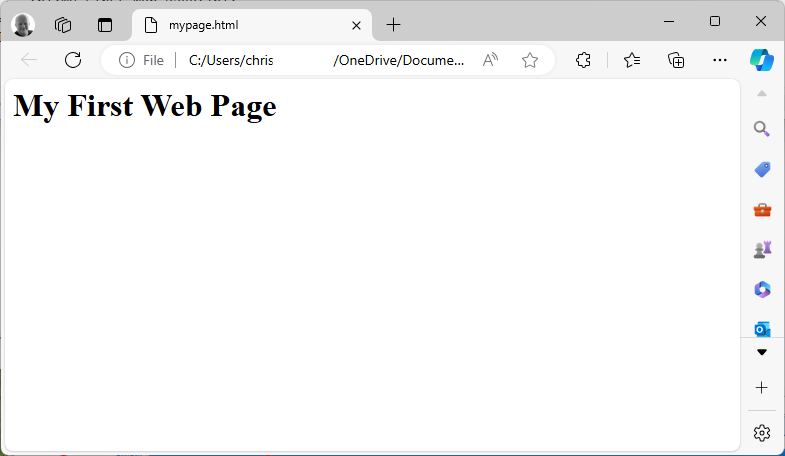
- Open the file in your browser by double-clicking on the new file in Windows Explorer. You should see a plain page with the text “My First Web Page” written on it that looks something like this:
You may be wondering what all the extra text in that file does, and what each of those “tags” added to the text file mean. Well, these are the tags used by HTML to determine how the page will look. Each tag is a pair of matching terms, with the closing tag starting with a slash /. Diamond brackets (“less than” < and “greater than” > signs) surround each tag and tell the browser that this is a bit of code, rather than text to display.
Our first pair of tags <html> and </html> surrounds the document and tells the browser that this is an HTML document. Next we have a <body> and </body> pair to denote the body of the document. Finally we have <h1> and </h1> and the text between these two tags is a level 1 heading.
There are lots of tags that can be used, here’s just some of them:
| opening tag | Closing Tag | Description |
|---|---|---|
<html> |
</html> |
An HTML document |
<head> |
</head> |
The header of the document |
<body> |
</body> |
The body of the document |
<title> |
</title> |
The title of the document. This goes inside the <head> tags and the text will appear in the tab name in the browser. |
<h1> |
</h1> |
A level 1 header (the biggest, top level header) |
<h2> |
</h2> |
A level 2 header (and you can carry on down, h3, h4, h5 etc…) |
<p> |
</p> |
A paragraph - normal body text. |
<img> |
</img> |
An image. |
<a> |
</a> |
A hyperlink- a link to another web page or site. |
Some tags can be passed parameters. For example the <img> image tag needs to include the web address of the image to show, or the <a> link tag needs to include the address of the page to link to. Parameters are passed within the diamond brackets, here are a couple of examples
The <a> link tag needs the URL (or relative path) of the page or site to link to. This is passed using the href= parameter. We also need to give the display text for the link, this is placed between the two tags as follows:
1<a href="https://isjw.uk/">Visit IT Should Just Work today!</a>
The <img> image tag needs the URL (or relative path) of the image to show. This is passed using the src= parameter like this:
1<img src="/path/to/myimage.png" />
Note that the <img tag is self-closed with /> at the end, rather than using a separate </img> tag. This is because there is no text to display here.
Let’s use some of these together to create a more advanced web page. Copy and paste the example below into a new text editor document.
 1<html>
 2    <head>
 3        <title>Web Page Two</title>
 4    </head>
 5    <body>
 6        <h1>My Second Web Page</h1>
 7        <h2>Introduction</h2>
 8        <p>
 9            This is my second web page. It is written in HTML.
10            I learnt this from <a href="https://isjw.uk">IT Should Just Work</a>.
11        </p>
12        <img src="https://isjw.uk/logos/isjw_no_url_72.png" />
13    </body>
14<html>
Save the document as mypage2.html and open it as before in your browser. It should look something like this:
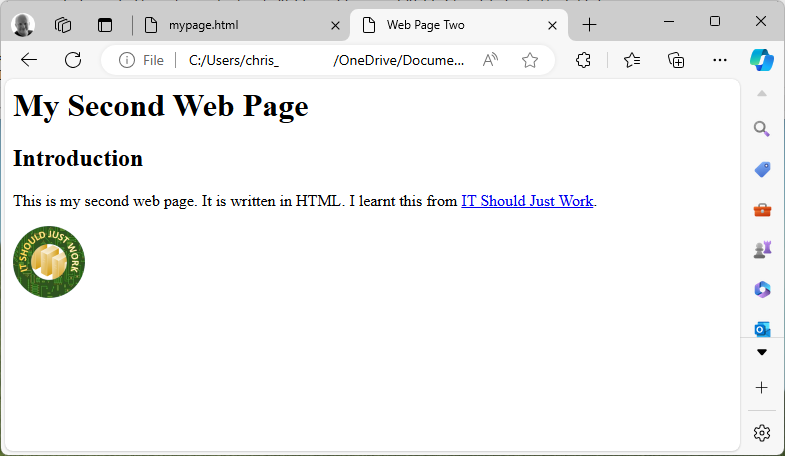
Note that the title is shown in the tab at the top of the browser, rather than just the filename as in our first web page. The page has level 1 and level 2 (“Introduction”) headings, and a short paragraph of text with a link. The bottom of the page has an image (the “IT Should Just Work” logo).
Want to learn more?
In this getting started article we’ve learnt what HTML is, and how to create a simple web page in this markup language using just a regular text editor.
Here’s a few suggested websites where you can find out more on this topic: